
Abstract
Sanding tools are essential for woodworking, metalworking, automotive refinishing, and DIY projects. However, many people who use them struggle to tell the difference between sanding sponges and sanding blocks.
According to Fine Woodworking magazine, the effectiveness of sanding tools can vary significantly in terms of abrasive material distribution, ergonomics, and surface adaptability (Smith, 2018). Further research in the Journal of Surface Engineering indicates that, while sanding sponges offer superior conformability to irregular surfaces, sanding blocks provide consistent pressure for flat surfaces. This affects both the quality of the finish and the longevity of the tool (Jones & Lee, 2020).
This article offers a comprehensive comparison of sanding sponges and blocks, analysing their construction, functional applications, advantages, limitations, cost-effectiveness, and best practices for professional and DIY use. By combining technical information with practical advice, this guide aims to provide users with the knowledge they need to select the right sanding tool for their projects.
Introduction
Sanding is a fundamental surface finishing process that aims to remove material irregularities and smooth rough textures in preparation for painting, staining, or sealing. Despite its apparent simplicity, sanding requires a high level of technique. Selecting the right tool is crucial as it directly affects surface uniformity, labour efficiency, and the final aesthetic quality.
Two common tools in this field are the sanding sponge and the sanding block. While they may appear similar to the untrained eye, they differ significantly in terms of their design, material properties, and functional applications. Failing to understand these differences can result in uneven finishes, wasted abrasives, and even damage to delicate surfaces.
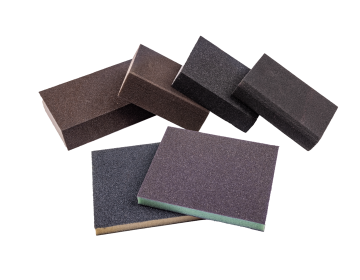
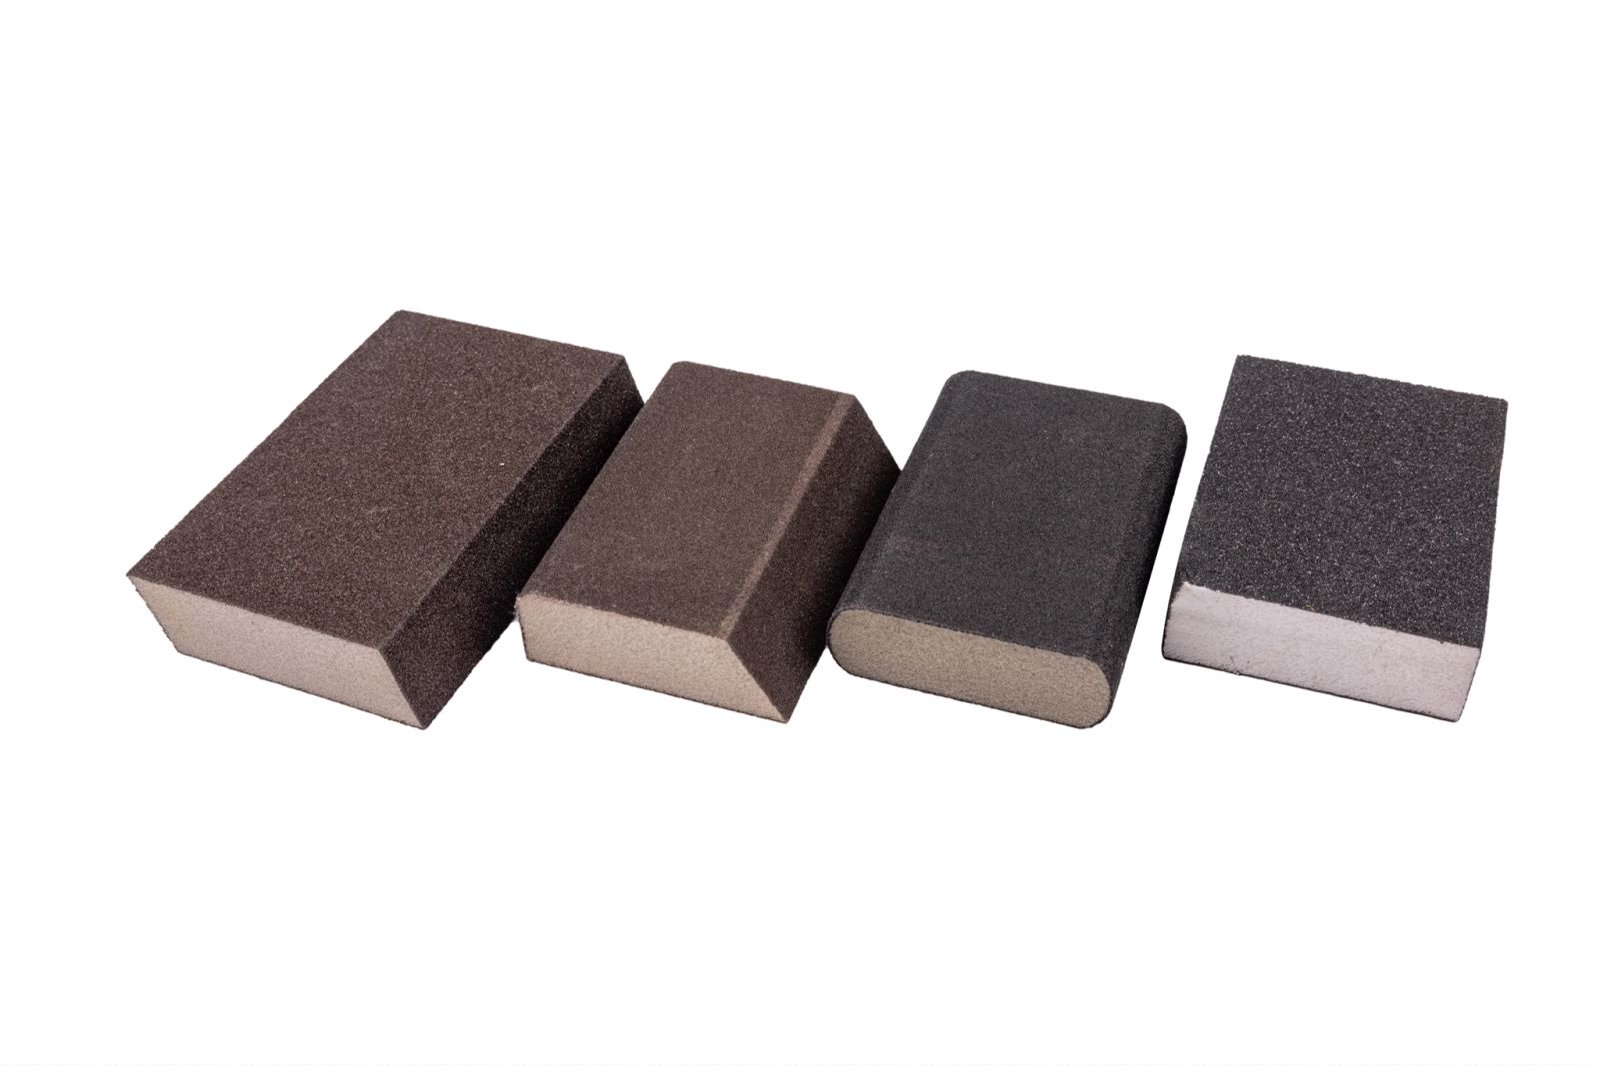
Sanding sponges are typically made of flexible foam impregnated with abrasive particles and offer a soft, comfortable interface. They are particularly useful for contoured or irregular surfaces, such as furniture edges, mouldings, and carved wood. In contrast, sanding blocks are rigid or semi-rigid tools, often made from wood, plastic, or rubber, with sandpaper affixed to a flat surface. Their rigidity ensures even pressure distribution across flat surfaces, which is crucial for surfaces such as cabinet doors, panels, and metal sheets.
The choice between a sanding sponge and a sanding block also depends on grit selection, ergonomics, and durability. Experts note that sanding sponges can bend and compress to reach grooves or corners, reducing the likelihood of gouges or uneven sanding (Brown, 2019). While less adaptable, sanding blocks allow precise control of pressure and are generally more efficient for large, flat areas.
The following sections will provide detailed comparisons of material construction, performance metrics, application scenarios, and economic considerations. Tables will summarise the key differences and provide practical guidance for professionals in the woodworking, automotive refinishing, and metalworking industries.
Background: Evolution of Sanding Tools
The process of sanding has evolved from the use of simple handheld abrasives to specialised tools that are designed to be efficient and precise. Traditionally, artisans would wrap sandpaper sheets around wooden blocks for added rigidity. This method was the precursor to the modern sanding block, ensuring even sanding on flat surfaces while reducing hand fatigue.
In the late 20th century, the sanding sponge emerged as an innovation for contoured surfaces. By embedding abrasive particles in flexible foam, manufacturers created a tool that could achieve smooth finishes on convex or concave surfaces without damaging the edges. Modern sanding sponges often feature dual-sided grit, with coarse and fine textures on opposite sides, which enhances their versatility for sequential sanding operations.
Technological advancements have further improved these tools. High-quality sanding blocks now incorporate ergonomic handles, replaceable pads, and advanced abrasive coatings that extend their lifespan and improve dust control. Similarly, foam formulations that maintain elasticity over extended use, resist tearing, and provide better abrasion resistance have benefited sanding sponges (Anderson, 2021).
Key Structural Differences Between Sanding Sponge and Sanding Block
| Feature | Sanding Sponge | Sanding Block |
| Base Material | Flexible foam | Wood, plastic, or rubber |
| Abrasive Surface | Embedded in foam, conformable | Flat sandpaper sheet or adhered pad |
| Surface Adaptability | Excellent for curves and grooves | Limited, best for flat surfaces |
| Pressure Distribution | Variable, dependent on hand control | Consistent across the block |
| Durability | Moderate, may compress or tear | High, long-lasting if used correctly |
| Ideal Applications | Contoured furniture, edges, molding | Flat panels, doors, sheet metal |
Performance Characteristics
The performance of a sanding tool depends largely on its material composition, the distribution of its grit, and its adaptability to the surface being worked on. The distinct performance characteristics of sanding sponges and sanding blocks influence the quality and efficiency of sanding operations.
- Sanding sponge performance
Sanding sponges excel in applications that require flexibility and conformity. Their foam base enables the abrasive particles to adapt to uneven surfaces, corners, and curves without applying excessive pressure that could damage the material. This property is particularly valuable in:
Woodworking: intricate carvings, mouldings, and furniture edges.
Automotive refinishing: sanding contours around panels, bumpers, and curves without damaging the primer layer.
Metalwork: smoothing rounded edges or small components.
One limitation of sanding sponges is the difficulty of controlling the pressure applied. As the foam compresses under pressure from the hand, it can be difficult to achieve perfectly flat surfaces, potentially leaving minor unevenness on planar surfaces. Furthermore, the abrasive particles embedded in the foam wear down faster when used aggressively, reducing their overall lifespan compared to rigid sanding blocks.
- Sanding block performance
Sanding blocks are designed to distribute pressure uniformly across flat surfaces. The rigidity of the block ensures that each pass of the sandpaper removes material consistently, minimising high or low spots. Key advantages include:
Efficient flattening of large panels, such as cabinet doors, tabletops, and sheet metal.
Greater control over sanding depth when finishing edges or surfaces requiring precision.
Longevity: sandpaper sheets can be replaced while the block itself remains durable for years.
However, sanding blocks are less effective on irregular or contoured surfaces. Using a rigid block on curved or carved areas may result in uneven sanding, rounded edges, or gouging, especially for inexperienced users.
Advantages and Limitations
- Sanding sponge
Advantages:
Surface conformability: – Adapts to curves, edges, and intricate details.
User-friendly: Lightweight and ergonomic design reduces hand fatigue during prolonged use.
Versatility: Often dual-sided with coarse and fine grits for multi-step sanding.
Reduced surface damage: The compressible foam reduces the risk of accidental gouging.
Limitations:
Pressure variability: Inconsistent pressure may result in uneven surfaces on flat panels.
Durability: The foam can wear out or compress over time, especially with aggressive sanding.
Cost per use: replacement frequency is higher compared to sanding blocks.
- Sanding block
Advantages:
Even pressure ensures uniform sanding on flat surfaces.
Durability: The solid base allows for long-term use, and the sandpaper is easily replaceable.
Precision: Ideal for tasks requiring exact surface flatness.
Limitations:
Limited conformability: Not suited to curves or detailed carvings.
Bulkier handling: Less ergonomic for prolonged sanding of intricate areas.
Risk of surface damage: There is a greater potential for gouging if applied incorrectly on non-flat surfaces.
Performance and Application Comparison
| Aspect | Sanding Sponge | Sanding Block |
| Surface Adaptability | Excellent (curves, grooves) | Poor (best on flat surfaces) |
| Pressure Control | Moderate, depends on hand technique | High, consistent |
| Abrasive Longevity | Moderate, wears faster on hard surfaces | High, sandpaper replaceable |
| Ergonomics | Lightweight, flexible, reduces fatigue | Bulkier, may strain hands on long sessions |
| Ideal Grit Transition | Dual-sided sponges for coarse → fine | Sandpaper sheets can be swapped as needed |
| Risk of Surface Damage | Low, compressible foam | Moderate to high on curved/irregular areas |
Industry-Specific Applications
- Woodworking
In furniture making, cabinetry and wood carving, sanding sponges are favoured for contoured shapes, intricate mouldings and detailed carvings, ensuring smooth transitions along edges. Sanding blocks are ideal for flat surfaces such as tabletops, doors, and panels, where maintaining flatness is essential for achieving a professional finish.
Example scenario: A craftsman refinishing a carved chair seat might use a sanding sponge for the curves and edges and then a sanding block to flatten the seat for even staining.
- Automotive refinishing
Due to the variety of surfaces, the automotive industry requires both tools:
Sanding sponges are ideal for bumpers, fender curves, and recessed areas where conformity is needed.
Sanding block: Essential for levelling flat body panels and primer surfaces to ensure smooth paint adhesion.
Professional auto body technicians often use a combination of both sequentially to achieve a consistent finish before painting.
- Metalworking
Metal fabrication involves working with flat sheets, tubing, and curved components.
Sanding block: Optimal for flat sheet metal, ensuring even material removal and preparation for coating.
Sanding sponge: Suitable for rounded edges, corners, or pipes, where rigid blocks cannot reach effectively.
Metalworkers often rotate grit grades, starting with a coarse abrasive to remove material and progressing to a fine grit for finishing, making the most of the strengths of each tool type.
Material Selection
Selecting the right material for sanding tools is fundamental to performance, durability, and finish quality. Sanding sponges and sanding blocks are available in a variety of substrates and abrasive coatings, each of which is tailored to specific applications.
- Sanding sponge materials
Sanding sponges consist primarily of a flexible foam core that is either infused or coated with abrasive particles. The density and elasticity of the foam directly affect how well the sponge conforms to surfaces.
Low-density foam: Soft and highly flexible, ideal for intricate curves and delicate materials. However, it compresses easily, which can reduce its abrasive efficiency when used on harder surfaces.
Medium-density foam: It balances flexibility and firmness, providing moderate conformability while maintaining consistent abrasion.
High-density foam: It is firm and durable, making it better suited to semi-flat surfaces, but it has reduced adaptability for tight corners.
The abrasive coatings on sponges range from aluminium oxide and silicon carbide to ceramic abrasives, depending on the surface material.
Aluminium oxide: Durable and versatile; effective for wood and metal.
Silicon carbide: Harder and suitable for fine finishing and harder surfaces, such as stone or metal.
Ceramic: Extremely hard and long-lasting; excellent for heavy-duty sanding of metal or composite materials.
- Sanding block materials
Sanding blocks are typically made from:
Wood: the traditional choice; sturdy and customisable with sandpaper sheets.
Plastic or polymer: Lightweight and often ergonomically designed, they are resistant to moisture.
Rubber-backed blocks: Slightly flexible, providing mild surface conformity while maintaining flatness.
The type of abrasive, grit size, and backing material of the sandpaper attached to the blocks also vary, which is crucial for consistent performance.
Grit Considerations
Selecting the right grit is critical for both tool types and directly affects the quality of the finish and the rate at which material is removed.
Coarse grits (40–80): These remove significant material quickly and are ideal for initial shaping or removing old finishes.
Medium grits (100–150): Suitable for smoothing surfaces and preparing them for the final finish.
Fine grits (180–320+): Used for finishing surfaces, removing minor scratches, and preparing for staining or painting.
Sanding sponges are particularly useful for finishing irregular surfaces, as they maintain contact with all curves, even when using fine grits. Sanding blocks are better suited to coarse and medium grits on flat surfaces, ensuring uniform material removal.
Cost Analysis
When evaluating the cost-effectiveness of sanding tools, it is important to consider both the initial cost and the lifecycle cost.
Sanding sponges: the need for frequent replacement can increase the overall cost, particularly when used for aggressive sanding on hard surfaces. However, their versatility reduces the need for multiple tool types for contoured surfaces.
Sanding block: Replacement is less frequent, but additional accessories like extra sandpaper sheets may be required. While the initial investment is slightly higher, long-term durability often offsets the cost.
Material, Grit, and Cost Overview
| Feature | Sanding Sponge | Sanding Block |
| Base Material | Flexible foam (low, medium, high density) | Wood, plastic, rubber |
| Abrasive Type | Aluminum oxide, silicon carbide, ceramic | Aluminum oxide, silicon carbide, ceramic |
| Adaptability to Surface | Excellent for curves and edges | Best on flat surfaces |
| Grit Range | 40–320+ | 40–320+ |
| Replacement Frequency | Moderate to high | Low to moderate |
| Cost Efficiency | Medium, depending on use intensity | High, durable over long-term use |
Best Practices for Use
- Sanding sponge
Apply light, even pressure. Allow the sponge to conform naturally to the surface. Excessive force can deform the foam and reduce the effectiveness of the abrasive.
Follow the grain direction. When sanding wood surfaces, always sand along the grain to minimise scratches.
Replace when worn. Foam compression or abrasive depletion can compromise the quality of the finish.
Use dual-sided grit efficiently. Start with the coarse side for shaping and then flip it over to the fine side for finishing.
- Sanding block
Ensure flat contact: Maintain consistent contact with the entire surface to avoid uneven sanding.
Replace sandpaper sheets as needed. Worn sheets reduce efficiency and may cause scratch marks.
Work sequentially: Begin with coarse grit to remove material, then progress to medium and fine grits for finishing.
Use ergonomic grips. Long sanding sessions benefit from blocks designed to be comfortable to hold, as this reduces fatigue and the risk of injury.
Integrating Both Tools
Professional users often combine both tools to make the most of their strengths.
Step 1: Use the sanding block on large, flat surfaces.
Step 2: Switch to a sanding sponge for edges, curves, and detailed areas.
Step 3: Finish with a fine-grit sponge or block, depending on the surface topology.
Integrating both tools enables craftsmen to achieve a balanced workflow that maximises efficiency while ensuring a high-quality finish across diverse surface geometries.
Maintenance Tips
To extend the lifespan of sanding tools, improve efficiency, and ensure a high-quality finish, proper maintenance is essential. Sanding sponges and sanding blocks require different care depending on their materials.
- Sanding sponge maintenance
Clean after use: Foam sponges tend to accumulate dust, which can clog the abrasive particles. Rinse gently under water or tap out dust. For stubborn debris, use a soft brush.
Avoid excessive moisture. While rinsing is acceptable, prolonged exposure to water may degrade the foam or loosen the abrasive particles.
Store flat. Avoid compressing or bending the sponge during storage, as this can permanently deform the foam.
Inspect regularly: Look out for worn edges or tears, as compromised sponges can reduce the quality of the sanding and may damage surfaces.
- Sanding block maintenance
Replace sandpaper sheets promptly. Worn sandpaper reduces efficiency and can cause uneven surfaces.
Clean flat surfaces: Dust can accumulate between the block and the sandpaper, reducing abrasion and causing scratches.
Check the integrity of the block: Wooden blocks may splinter, and plastic or rubber blocks may crack under heavy use. Replace as necessary.
Store properly: Keep the blocks dry and away from direct sunlight to prevent warping or degradation.
Safety Considerations
Although sanding is generally safe, it can present dust, ergonomic, and chemical hazards. Both professionals and DIY enthusiasts must take precautions to avoid injury or long-term health issues.
Wear protective gear: Safety glasses, dust masks or respirators, and gloves will protect you against airborne particles and skin irritation.
Work in a ventilated area. Wood, metal, and paint dust can be harmful if inhaled over extended periods.
Avoid excessive force: Applying too much pressure can strain your hands or wrists, especially when using sanding blocks.
Monitor for tool fatigue. Foam sponges can tear unexpectedly, and rigid blocks may cause repetitive strain injuries if handled incorrectly.
Environmental Impact
The environmental footprint of modern sanding tools varies. When it comes to sustainability, the following factors are important:
Sanding sponges: Typically made from synthetic foam and abrasives, they are not biodegradable. Minimising overuse and recycling or repurposing the foam can reduce environmental impact.
Sanding blocks: Wooden blocks sourced from certified forests are more sustainable. Although plastic or rubber blocks are durable, they contribute to plastic waste at the end of their life.
Dust Management: Collecting dust from sanding operations prevents air pollution and facilitates material recovery, particularly for wood and metal dust.
FAQ Module
- Can I use a sanding sponge instead of a sanding block for all projects?
No. Sanding sponges excel on curved or detailed surfaces but may not provide consistent pressure on large, flat panels. Sanding blocks are preferred for flat surfaces.
- How do I choose the right grit for sanding?
Start with coarse grit (40–80) for material removal, medium grit (100–150) for smoothing, and fine grit (180–320+) for finishing. Always consider the surface type and material.
- Are sanding sponges reusable?
Yes, but their lifespan depends on usage intensity. Clean them regularly and avoid excessive force to maximize durability.
- How do I prevent scratches with sanding blocks?
Ensure flat, even contact with the surface, replace worn sandpaper sheets promptly, and sand along the material grain.
- Can sanding blocks and sponges be used on metal surfaces?
Yes. Use abrasives suitable for metal (aluminum oxide or ceramic) and ensure proper dust collection. Sanding sponges help with curved edges, while blocks provide uniform flat surface abrasion.
- How should I dispose of used sanding sponges?
Dispose of foam sponges responsibly. Some industrial facilities recycle foam, but most household sponges must be discarded with general waste. Avoid burning, as synthetic foams release toxic fumes.
Conclusion
Understanding material properties, grit selection, and proper maintenance enables users to optimise the performance of sanding sponges and blocks. Strategically combining these tools ensures superior surface finishing, efficiency, and cost-effectiveness. Incorporating safety and environmental awareness into your work enhances your professionalism and makes you a responsible DIYer.